
Defective Dinosaur Repair
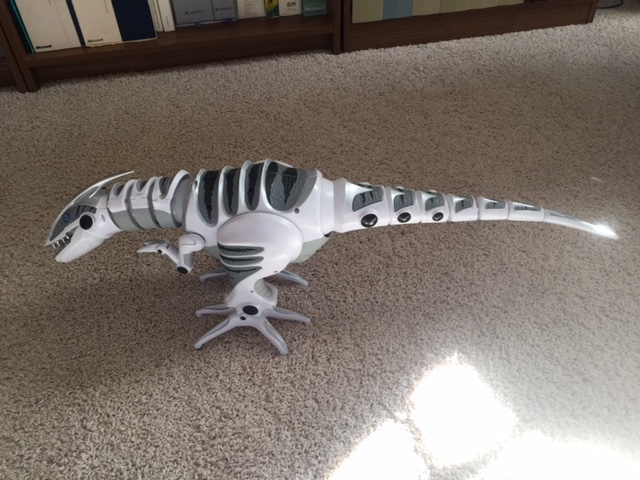 My sister came to me with her defective dinosaur. She had bought it on sale, then discovered that it was missing the cover to its battery holder.

It would obviously be inconvenient if the batteries fell out while in the middle of eating tourists or stalking small children (I assume that is what she got the dinosaur for–I don’t like to ask). She asked me if I could 3D print her a replacement, and I, picturing a simple rectangular battery cover, agreed. To be fair, I’ll agree to 3D print almost anything–If I can come up with a few hundred useful things, I might eventually be able to justify buying the thing!
My first sense of impending trouble occurred when she delivered the dinosaur, along with a battery cover from a second one that she also owned (don’t forget that raptors are pack hunters). It was not a nice, simple shape, but looked like this:
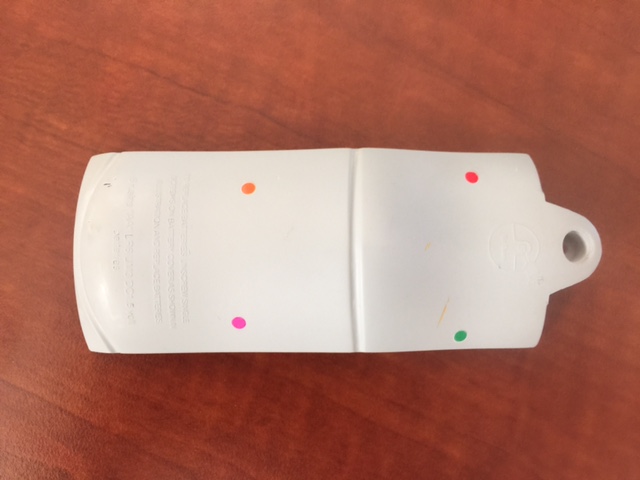

(Ignore the colored dots for the moment). It is a little hard to tell, but not only is this cover covered in curves, but the top curves in two directions! I have some basic CAD skills, primarily using FreeCAD, and can make squares and circles with the best of them, but I couldn’t figure out how to model the fancy curves. I considered taking a few on-line courses (vs. my usual technique of random clicking in the UI until things start working) but decided that I was too lazy.
Fortunately, our local library 21C, has a maker space! Aside from a number of 3D printers, laser cutters, a CNC machine, sewing machines, etc., they also have a NextEngine 3D Laser Scanner. This is not your grandfather’s library!
One of the makers-in-residence, Daniel, spent several hours walking me through the scanning process. This was what the process looked like in my head:
- Plunk object onto scan platform
- Hit scan button
- Wait 1 minute
- Get perfect model out, ready for printing
- Receive plaudits from sister and mother for being worthy and valuable sibling
Sadly, reality was a little more complicated:
- Put lots of little dots onto object. These are used for registration later, when you want to combine several different scans–you line up the different scans on the dots.
- Carefully put the object onto the platform. There is a little arm that can be moved and then tightened, which holds the object in place.
- Line up the scanner an appropriate distance from the object (the scanner is a separate box from the turntable) and make sure that your object is as well centered as you can make it so that the scan won’t get skewed.
- Start the scan. In the mode I used, it took 12 separate “pictures”, rotating the object 30° in between. The scanner then runs a laser slowly over the object and measures the bounce-backs to capture the details of the object. The first scan took about 35 minutes.
- Because this was a single scan, it did produce a 3D model in the software. However, the model also included part of the platform and the arm that was holding the object in place. Using the software, had to carefully remove those parts from the scan.
- Also, there were lots of bits missing from the scan. The top and bottom were incomplete, and the dividers in the bottom, which hold the batteries properly in place, were all partially missing. To deal with this, had to do several more scans, with the object positioned differently on the platform. Fortunately, these were not complete “360°” scans, but only included 3 separate “images”, so took a lot less time.
- I ended up doing 3 additional scans like this–top, bottom, and a better angle on the back. As before, I had to then carefully remove the platform and arm from the scans.
- The next step was to merge the different scans into a single object. This is done by telling the program which spots on each scan should be aligned with the others. Back to the little colored dots. Basically, you just find three colored dots in common with each scan, and tell the software (well, drop an anchor point) which ones are the same. The reason for all the dots is that only a few show up in each of the scans. In some cases, there were not 3 points in common (the minimum required) so I ended up having to use other shapes on the object.
- Once you’ve identified the spots, the software does the hard work of merging. It takes a minute or two each time, but is pretty impressive.
- Of course, a 3D model like this is actually built of lots of little triangles. All the merging ends up making a bit of a mess, so the software next has an option to smooth and simplify the geometry. This again takes a few minutes–some painful math is going on here. Finally, though, you can export the shape as an STL file, almost suitable for printing.
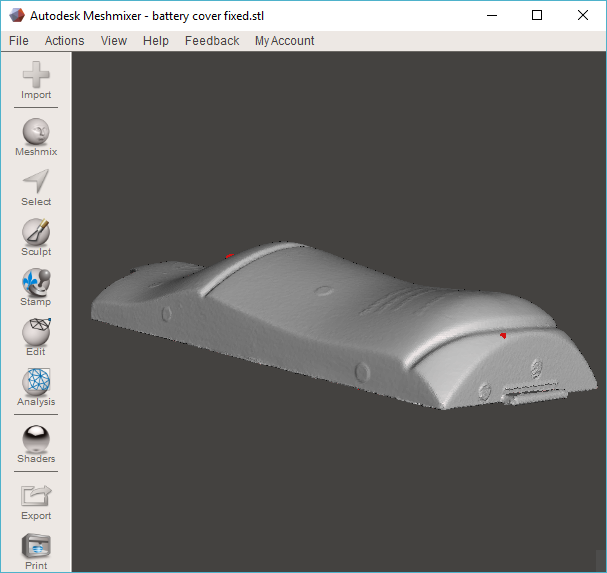
- However, almost is not quite good enough. The next step was to bring the file into Meshmixer, a free program from Autodesk for working with meshes. It has a very handy inspection feature that will find holes and overlaps and simply fix them. Here is the final model in Meshmixer after doing the corrections:
I should mention that I basically went through this entire process 3 times before getting a successful scan. The first two times, the model was very messed up–messed up to the point that when Meshmixer tried to fix it up, it found about 7000 errors, then crashed! I finally realized that the problem was that the cover was too reflective, and so ended dipping it in talcum powder, which fixed the problem. Note also that you can actually see the colored dots are part of the model–the laser has no problem at all picking them up.
I could have used Meshmixer to clear off those dots. Also, the hole for the screw that holds the cover in place was mostly filled in, and I could have fixed that too, but I figured that the dots weren’t that big a deal, and it would be easier to just drill out the hole after printing, since it was a one-off. Here is the final printed cover:
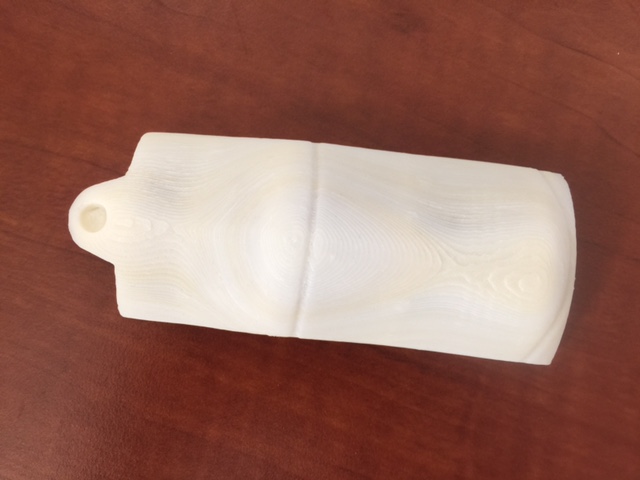
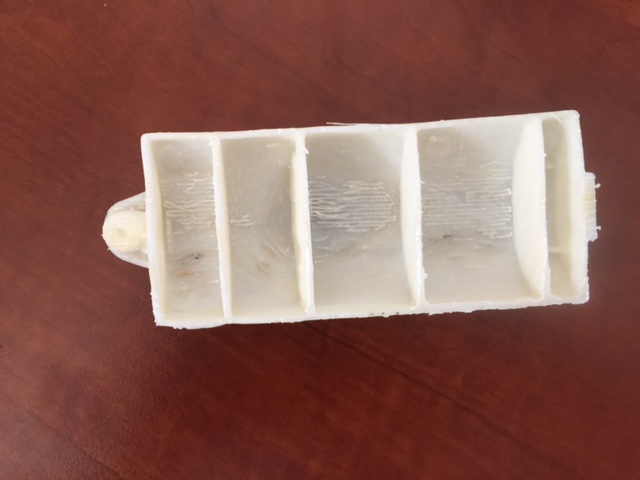
This is actually my test print. The final was done at higher resolution, and took about 8 hours to print (vs. about 4 for the test print). The roughness you see on the inside is because I had to print scaffolding, which I generally hate to do–Cura (and most other) output programs just don’t do a great job with scaffolding, and it is a royal pain to remove it. I ended up breaking one of the cross-supports while removing the scaffolding the first time and had to do another print.
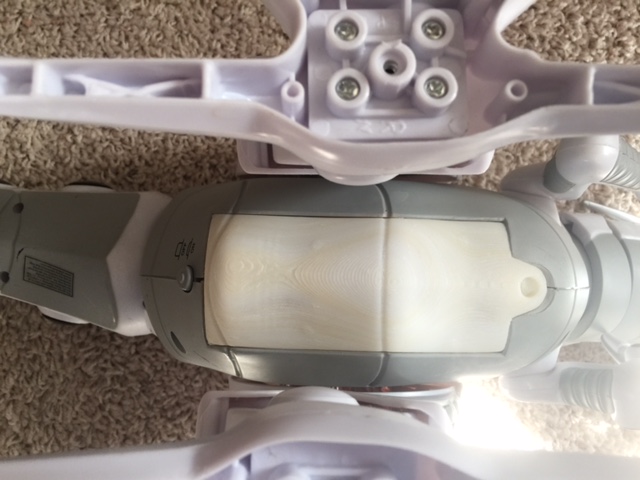
Here is a shot of the battery cover in place, and the dinosaur ready to wreak havoc amongst the populace (as soon as it manages to get off of its back):
wow – such an interesting process – thanks for sharing!!
I’m sure this will have earned you a place in the “worthy and valuable sibling” Hall of Fame!
You’re not a bad cousin either :O)
Can you print me a Canon 5D mark 4???????
You just need to send me a Cannon 5D mark 4 to scan, then I’ll send you back several in different colors of plastic. I can drill a hole and give you a bit of tape, and it should work great as a pinhole camera!
Next thing you know is she’ll give you a battery cover and ask you to 3D print a dinosaur to fit it.
Oh, you’re all such wags!
Definitely a worthy and valuable sibling! I had no idea that the process would be such a palaver when I asked you for this. You and Daniel at 21C deserve massive accolades-as soon as I can think of some. Happy dinosaur will enjoy wreaking havoc on the populace as soon as I can dig out the 300 batteries he needs to operate!